
on-premise APP User Manual
V6
Table of Contents
The aecoPost on-premise is a reflective electronic paper display. Users can easily make content changes through a dedicated application, with aecoPost connecting to the app via Wi-Fi AP, providing a more convenient way to operate.
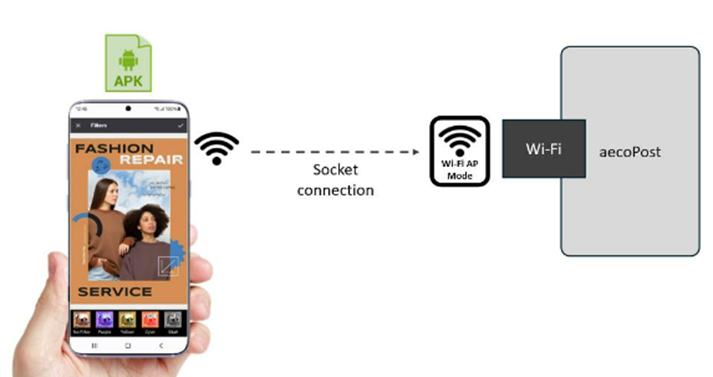
Figure 1: Conceptual Architecture Diagram
The following devices have been fully tested and certified for use with this application:
- Samsung: S24 FE/ S23 Ultra/ S23 FE/ S9/ A54/ A52s/ A52/ A15/ Tab S9 FE(Tablet)
- Google: Pixel 7PRO/ Pixel 3a
l Minimum Android Requirements: Version 9 or higher
https://1drv.ms/f/s!AtKGPi_BiEhpmIQx-K_b1KOyL_SyQA
The installation steps are shown below. (Figure 2)
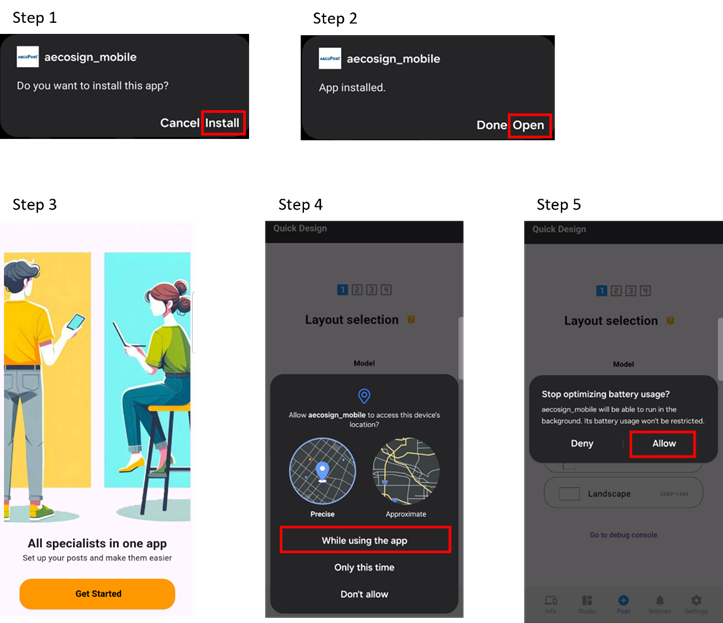
Figure 2: APK installation process

Introduction to the Main Features Menu of the App.
Provides management and query functions for detailed device information, including battery level, device dimensions, content storage capacity, firmware version, and last connection time. Please refer to the connection method below. (Figure 3-1)

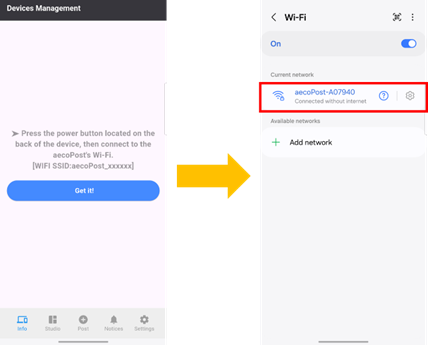
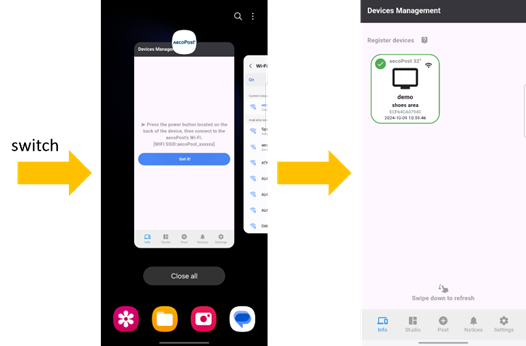
Figure 3-1: How to add an aecoPost
To remove a
device, long press on the device option, and a confirmation message will appear
asking for deletion. The screen will refresh automatically,
you can swipe down to refresh manually.
(Figure 3-2)

Figure 3-2: How to delete an aecoPost
After the connection is successful, you can click on the device to view its detailed information and provide a custom name. (Figure 3-3)
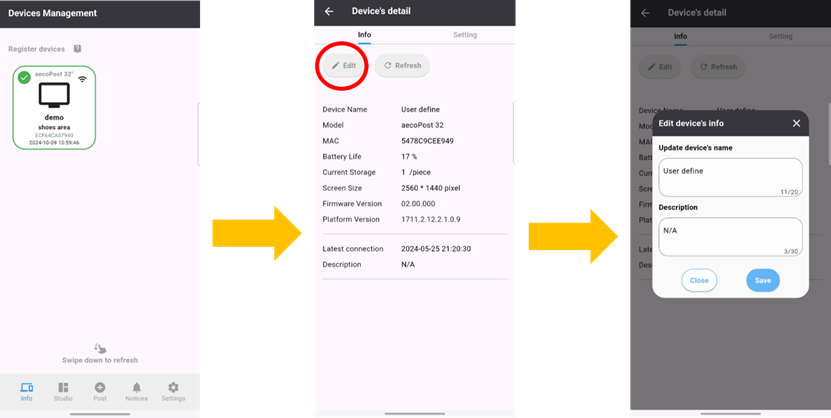
Figure 3-3: Device information
When an exclamation mark appears on the device screen, it indicates that the device has not been connected or updated for an extended period. After selecting the device, you will see an “Update” button. (Figure 3-4)
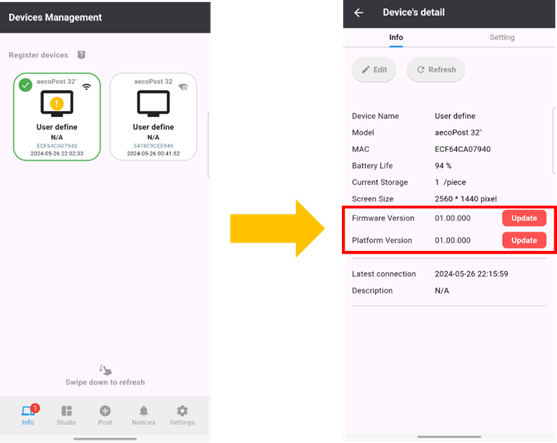
Figure 3-4: Device update
Tapping it will prompt you to connect the device to Wi-Fi. Once connected, the system will confirm whether you want to proceed with the software update. Upon confirmation, the device will begin updating. (Figure 3-5)
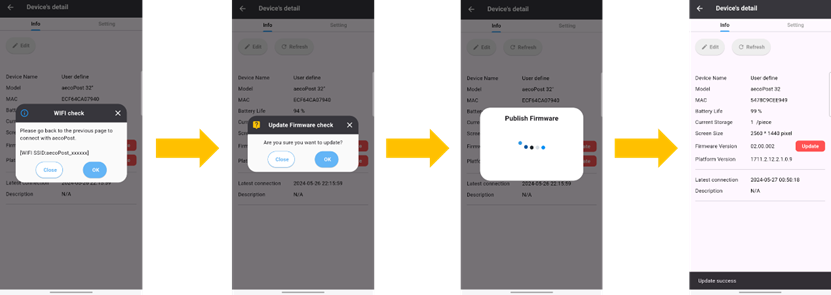
Figure 3-5: Device update check
![]()
*Available in future updates
Rotation Screen
Provide users with the flexibility to adjust the orientation based on the device's placement, ensuring that subsequent images are generated in the correct orientation without the need for further manual adjustments. (Figure 3-6)

Figure 3-6: Rotation Rule
![]()
Eco Mode
You can flexibly configure the time for the device to enter power-saving mode after completing each image processing task. The default setting is 180 seconds, aiming to achieve energy conservation and carbon reduction. (Figure 3-7)
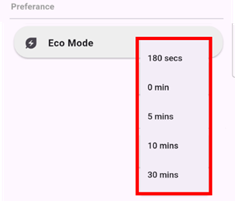
Figure 3-7: Eco Mode setting
Wifi Password
To protect privacy, users are provided with the option to reset the device's Wi-Fi password.
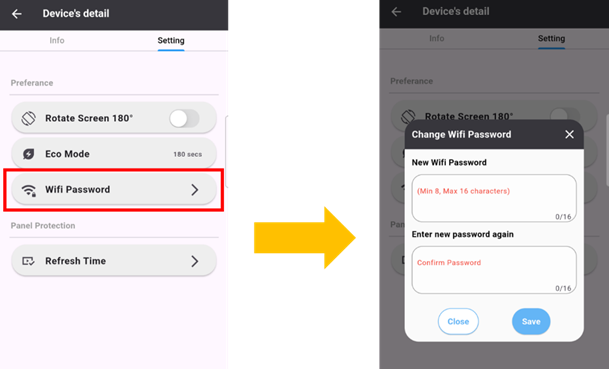
Figure 3-8: Change Wifi Password
Refresh Time
To extend the device's lifespan, it will automatically refresh the screen daily to prevent ghosting caused by prolonged inactivity on the e-ink display. Users can also customize the screen refresh time based on their specific needs.
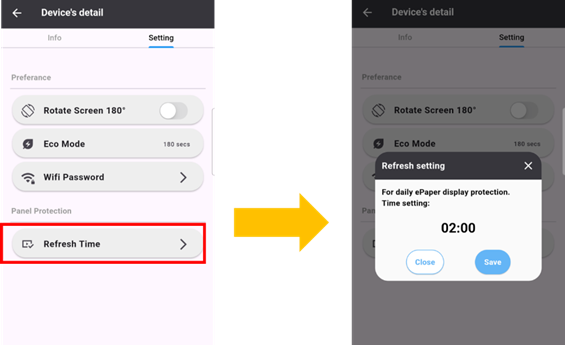
Figure 3-9: Change refresh time
Content management
Allowing users to upload and manage pre-edited content.
![]()
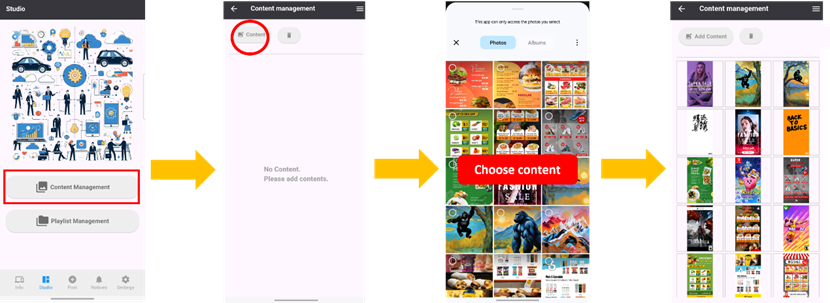
Figure 4-1: How to add content into content management
The top right corner of the screen offers options such as "Edit," "Select All," and "Refresh" for use. In the illustration of Figure 4-3, the select button is in the top left corner, and the preview button is in the bottom right corner.
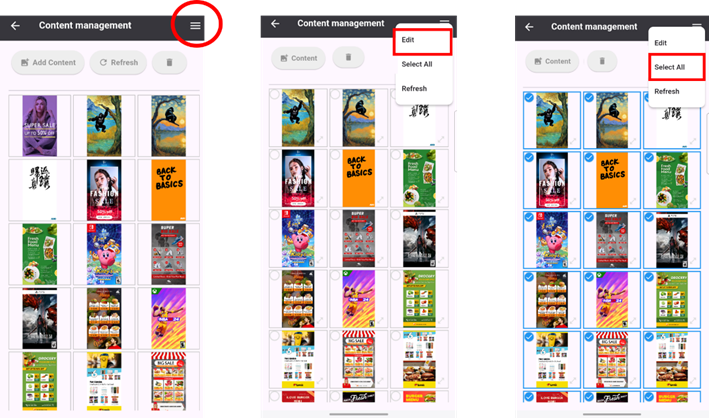
Figure 4-2: Other Button Features
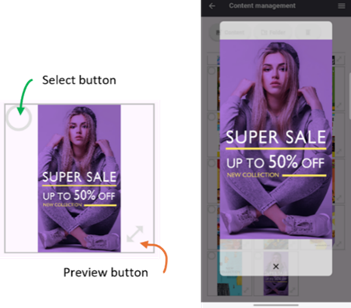
Figure 4-3: Button illustration
Playlist management
*Available in future updates
Playlist management allows users to predefine and organize the planned content for playback, enabling cyclic playback based on the designed duration.
Here are the steps to create a new playlist:
- Tap the "Create New Playlist" button.
- Provide a name for the playlist and select the device model along with its layout or orientation.
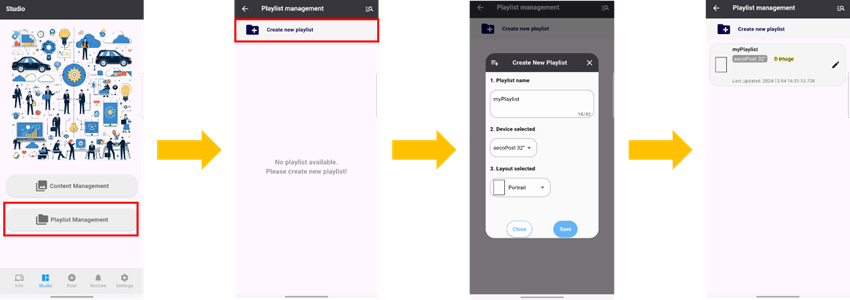
Figure 4-4: Create new playlist
This feature allows users to rename an existing playlist to better reflect its content or improve manageability. Users can select the playlist they wish to rename, enter the new name, and save the update. (Figure 4-5)

Figure 4-5: Update playlist name
Adding Content to the Playlist
You can add
content to the playlist here, following the same steps as before, including
adjusting the content color.
Once the addition is complete, you can configure the following settings for
each content item:
1.Duration: Set the playback length for each item, with a minimum limit of 3 minutes.
2.Visibility: Choose whether to hide or display the content in the playlist.
3.Order Adjustment: Rearrange the playback order by dragging and moving the items.
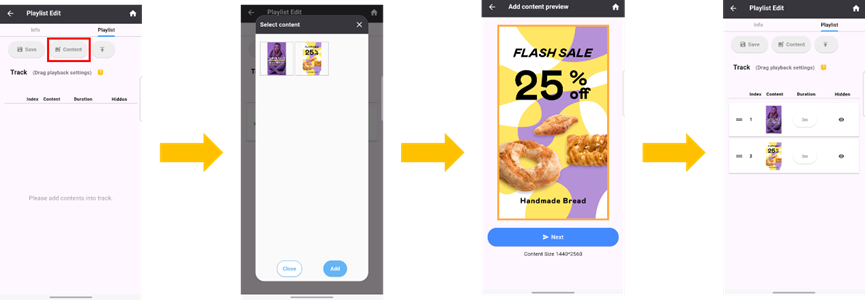
Figure 4-6: Add content into playlist
To delete a playlist, swipe left on the playlist you want to remove. A confirmation message will appear to ensure the deletion. (Figure 4-7)
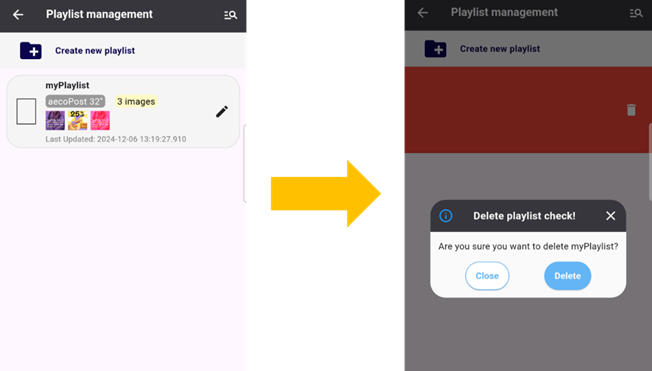
Figure 4-7: Delete playlist
 Quick Design
Quick design can make user change content quickly and easily.
Follow the steps:
1. Select the device model and orientation.
2. Choose the method for uploading content. (Figure 5-1~5-3)
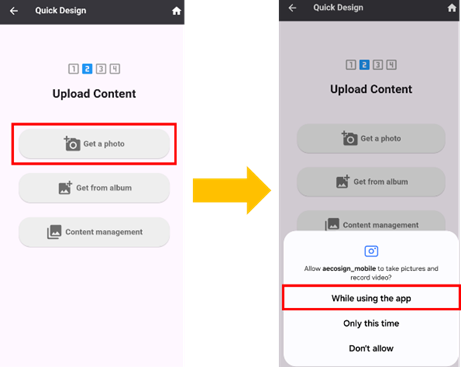
Figure 5-1: Options for selecting a photo
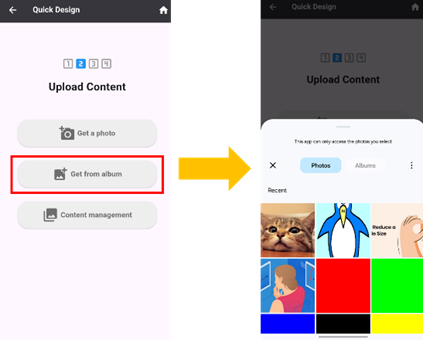
Figure 5-2: Options for selecting from the album.
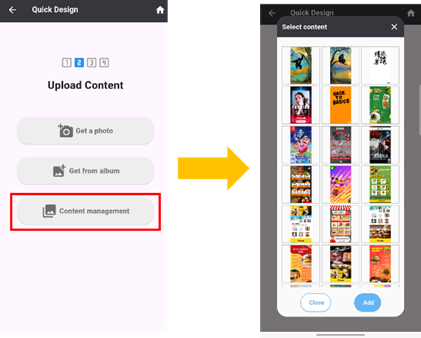
Figure 5-3: Options for using content in content management

3. Preview and confirm the content to be published. (Figure 5-4)
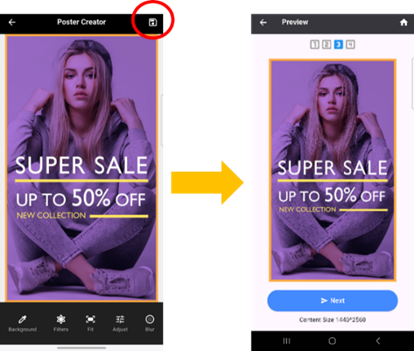
Figure 5-4: Enter the Poster Creator
4. Connect with the aecoPost and publish content. Press the "Connect with Device" button on the screen, or manually go to the phone's Wi-Fi settings. Wait until the connection is successfully established. (Figure 5-5)
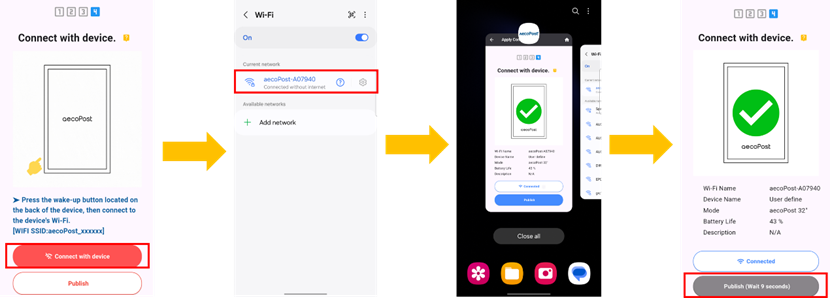
Figure 5-5: Connect step
 Notices
Provide relevant action information reminders, with the information being retained for only three months.
App's basic features are currently under development and only available for viewing. (Figure 6)
Software
version: Displays the app version
Language: The current language used by the app
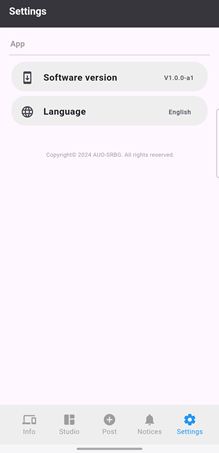
Figure 6: Setting page
Poster Creator is specifically designed to facilitate content editing and customization. Users can customize the background, apply filters, and fine-tune the image's brightness, contrast, saturation, and blur settings. After clicking the checkmark icon in the top right corner, the chosen settings will be saved and overwrite the original image.
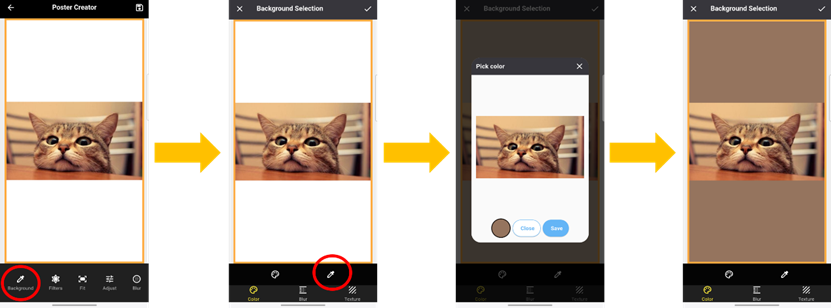
Provide options for customized background adjustments, including colors, blur effects, and textured backgrounds.
To select
colors, use the color palette or
sample colors directly from a reference image.
(Figure 7-1~7-2)
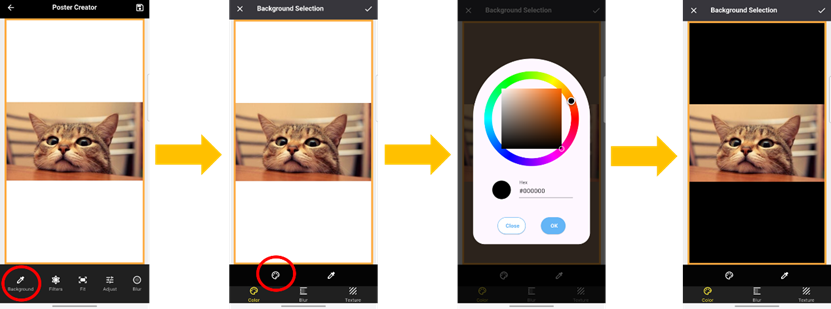
Figure 7-1: Color palette
The background blur effect allows flexible changes to the background and adjustment of the blur intensity. By default, the background is set to the active content. Tap the button marked with a circle in the bottom left corner to open the photo album and change the background. (Figure 8)
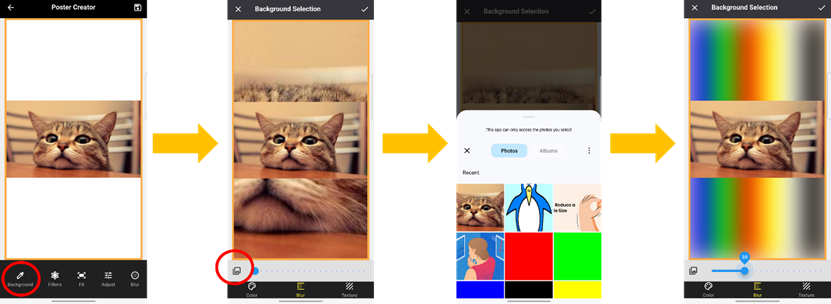
Figure 8: Background blur sample
Provide texture templates for background selection. (Figure 9)

Figure 9: Background use texture sample
Provide filter templates for flexible selection. (Figure10)
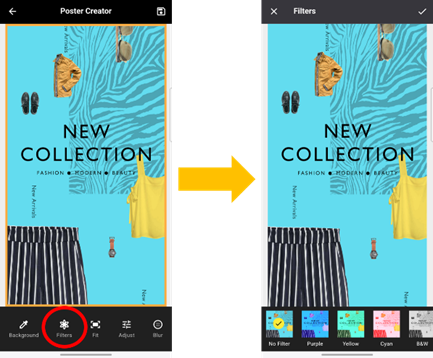
Figure 10: Filters selection
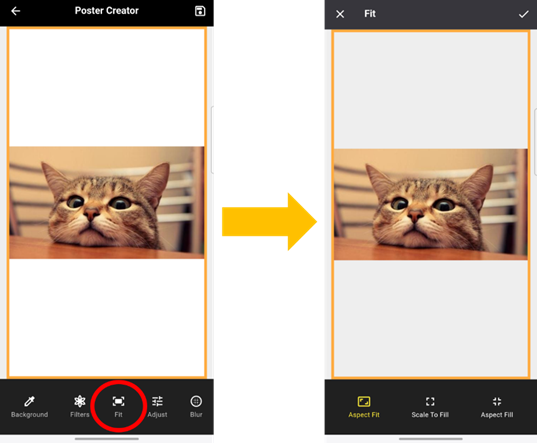
When the content is not full-screen, the FIT function can be used, offering three options:
- Aspect Fit: Maintains the aspect ratio of the content, scaling it to fit entirely within the container, which may result in letterboxing (empty space). (Figure 11-1)
- Scale Fill: Forces the content to scale and fill the container, possibly distorting its aspect ratio. (Figure 11-2)
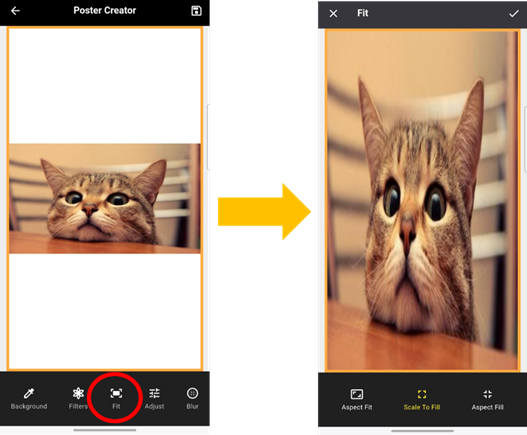
Figure 11-2: Fit: Scale Fit
- Aspect Fill: Maintains the aspect ratio of the content and scales it to fill the container. The system automatically compares the width and height scaling ratios and selects the larger one as the final scaling ratio. This ensures the content fills the container while keeping its proportions, although some parts may be cropped. (Figure 11-3)
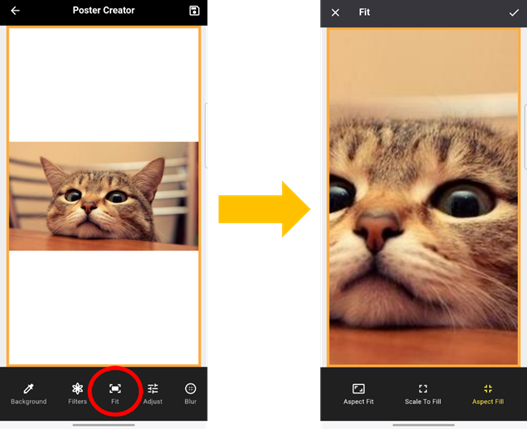
Figure 11-3: Fit: Aspect Fill
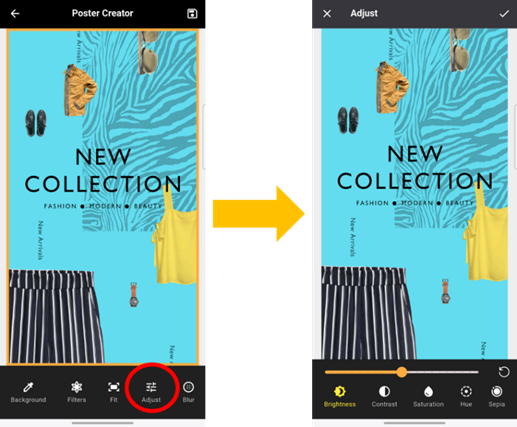
The adjust function allows users to modify the brightness, contrast, saturation, hue, and other parameters of the content display freely. (Figure 12)
The blur function offers various blur styles and allows flexible adjustment of the blur intensity along the X and Y axes. (Figure 13)
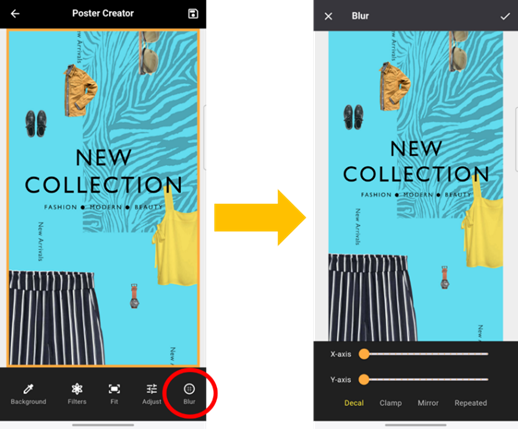
Figure 13: Blur function
l
v1.0.0-a4
(Released: December 03, 2024)
Latest alpha version with enhanced features, including OS version compatibility
checks and system information reporting functionality.
l
v1.0.0-a3
(Released: November 22, 2024)
Updated alpha version with additional features and fixes.
l
v1.0.0-a2
(Released: October 25, 2024)
Updated alpha version with improvements and bug fixes.
l
v1.0.0-a
(Released: August 20, 2024)
Initial alpha release.